Technical Forums» Technical / Performance» The DIY turbo build thread - Page 3
|
Danvillan » CMF Member Mulgoa Australia Member since:  Posts:  |
The DIY turbo build thread - Page 3 |
Mon 17 Jun 2013 08:05:14 PM |
|
Previous threads - page 1 = http://www.micra.com.au/community/message.php?messageid=82211
Page 2 = http://www.micra.com.au/community/message.php?messageid=83002 Thread getting a bit long new page. |
||
|
|
||
|
Danvillan » CMF Member Mulgoa Australia Member since: Posts: |
Re: The DIY turbo build thread - Page 3 |
Mon 17 Jun 2013 08:08:27 PM |
|
Engine and gearbox installed. Got the engine in on my own (no crane just manual labour) but the gearbox is a two man job (probably be able to do it with one person but it would be a pain)
Install 4.3kg Jun flywheel and HD clutch/pressure plate |
||
Image Attached: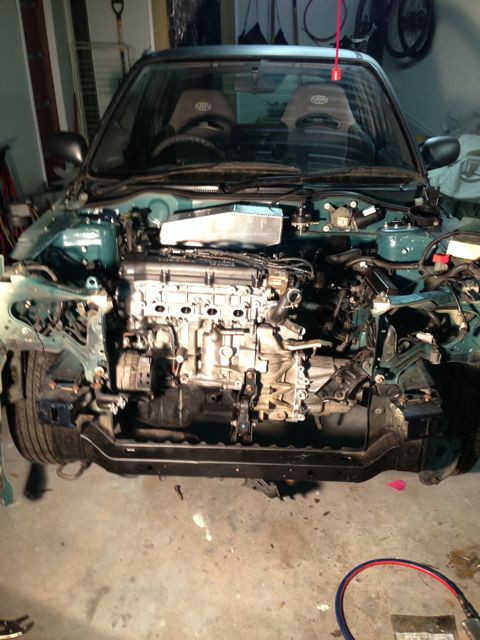
|
||
|
Danvillan » CMF Member Mulgoa Australia Member since: Posts: |
Re: The DIY turbo build thread - Page 3 |
Mon 17 Jun 2013 08:30:25 PM |
|
side view with the intake plenum test fitted. Don't think I'll be using the strut brace its about 10mm too high. Measured the Plenum off my old micra with shit mounts so the engine was a bit lower, just hoping the bonnet closes (should be ok)
|
||
Image Attached: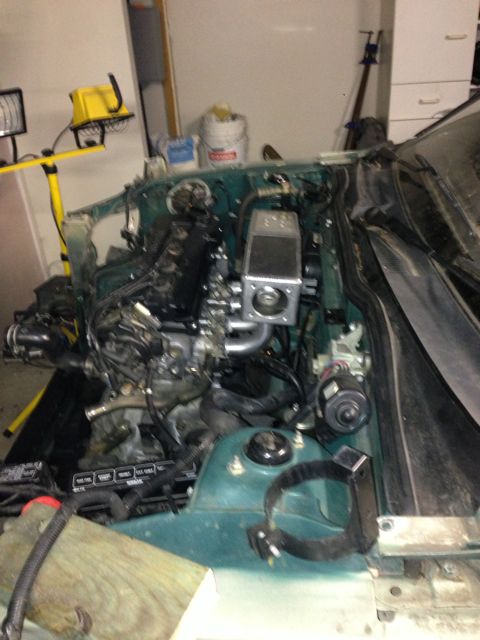
|
||
|
Pierce » CMF Member Logan Australia Member since: Posts: |
Re: The DIY turbo build thread - Page 3 |
Mon 17 Jun 2013 08:55:04 PM |
|
Looking good mate! Shame about the internals never getting off the ground though. After seeing how long those intake runners were on part 2, I was really concerned you wouldn't be able to get the bonnet closed.
I knew the strut brace was out of the question (however you could do a modified brace from each strut to the firewall centre directly behend the plenum). It's coming along now. I finally have all my parts all gathered (only waiting on my JUN f/wheel). Will still be half a year before I'm close to on road though... When do you see yours being registered? |
||
|
Danvillan » CMF Member Mulgoa Australia Member since: Posts: |
Re: The DIY turbo build thread - Page 3 |
Mon 17 Jun 2013 09:37:31 PM |
|
Hey Pierce, I'm hoping to have it on the road by August/September....hopefully. Mainly just ECU wiring, exhaust, tune, turbo rebuild and lots of little bits and pieces.
|
||
|
Rudy » CMF Member Hunter Valley mob 0400767960 Australia Member since: Posts: |
Re: The DIY turbo build thread - Page 3 |
Mon 17 Jun 2013 09:48:48 PM |
|
luv ya thread, I was worryin about the height of it too, looks tall
|
||
|
Danvillan » CMF Member Mulgoa Australia Member since: Posts: |
Re: The DIY turbo build thread - Page 3 |
Sat 22 Jun 2013 07:27:25 PM |
|
Overhauled the CV joints and new boots for the custom driveshafts, oil in the box so the Micra now officially has a N15/N13 hybrid VLSD gearbox / custom shafts.
Finished off the front suspension components as well installed the whiteline front sway bar with poly bushes. |
||
Image Attached: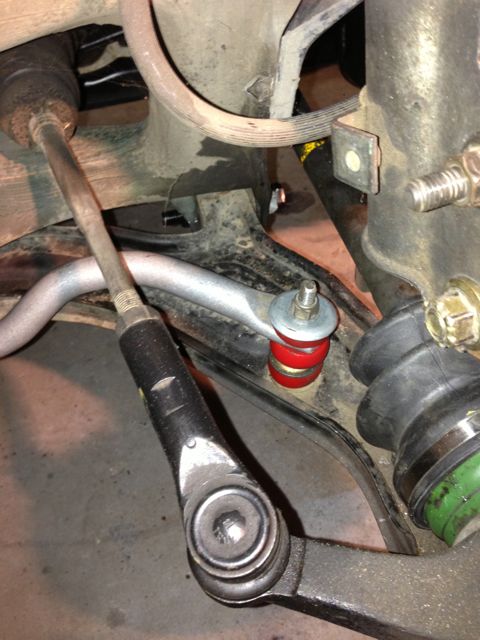
|
||
|
Danvillan » CMF Member Mulgoa Australia Member since: Posts: |
Re: The DIY turbo build thread - Page 3 |
Sat 22 Jun 2013 07:30:55 PM |
|
Installed the castor kit and whiteline lower control arm brace. Suspension all done just gotta try and see if the Nismo strut brace will fit with the tall plenum.
|
||
Image Attached: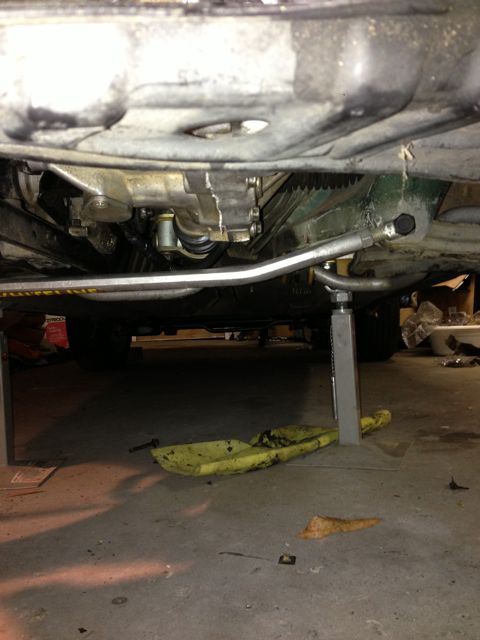
|
||
|
Danvillan » CMF Member Mulgoa Australia Member since: Posts: |
Re: The DIY turbo build thread - Page 3 |
Sat 22 Jun 2013 07:55:16 PM |
|
DIY Fuel injection cleaning.
I picked up an old set of Purple SR20det injectors 370cc for $40. Checked the impedance and all seems good. Don't know how long they have been sitting around for so thought I would try and give them a clean on the cheap. Removed the pintle caps, o-rings and filters for the injectors. Went to Jaycar and picked up a 9 volt battery + plug, momentary switch, and some alligator clips. Costed less than $10. Rigged up the battery and switch to activate the injectors |
||
Image Attached: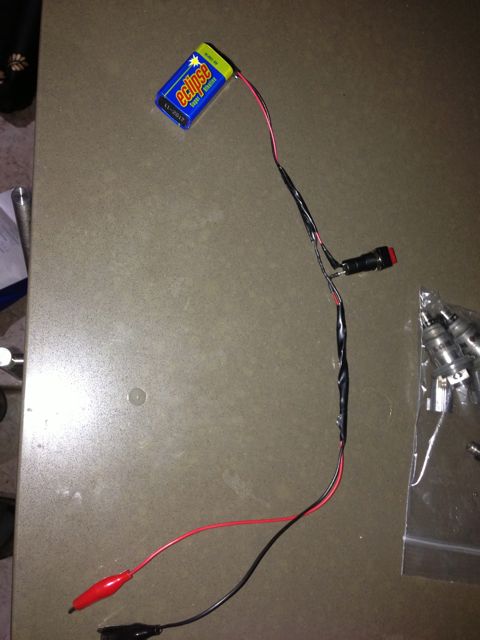
|
||
|
Danvillan » CMF Member Mulgoa Australia Member since: Posts: |
Re: The DIY turbo build thread - Page 3 |
Sat 22 Jun 2013 08:07:18 PM |
|
Picked up a cheap Ultrasonic cleaner from eBay for $5. A can of carby cleaner for $7. Sprayed the carby cleaner into the ultrasonic cleaner.
Placed a piece of 8mm tubing on the end of the injector. Run a cycle on the cleaner to let the dirt break up a bit, giving the switch a few clicks to loosen up the dirt inside the injectors. Second cycle suck the cleaner through the hose (making sure not to drink it like I did), turning the injector on and off while doing it. Then blowing it back through the injector to get rid of any big chucks that wont pass through the holes in the injector. **** WARNING: IF USING A SIMILAR ULTRASONIC CLEANER REMOVER ALL THE PLASTIC***** I USED THE PLASTIC STAND WHICH THE CARBY CLEANER MELTED AS YOU CAN SEE FROM THE MILKY COLOUR OF THE SOLVENT. I HAD TO BUY ANOTHER CAN TO RINSE ANY PLASTIC FILM LEFT FROM THE FIRST ATTEMPT. DOH. |
||
Image Attached:
|
||
|
Danvillan » CMF Member Mulgoa Australia Member since: Posts: |
Re: The DIY turbo build thread - Page 3 |
Thu 27 Jun 2013 08:01:39 PM |
|
New injector kit arrived including new pintle, o-rings and filter.
|
||
Image Attached: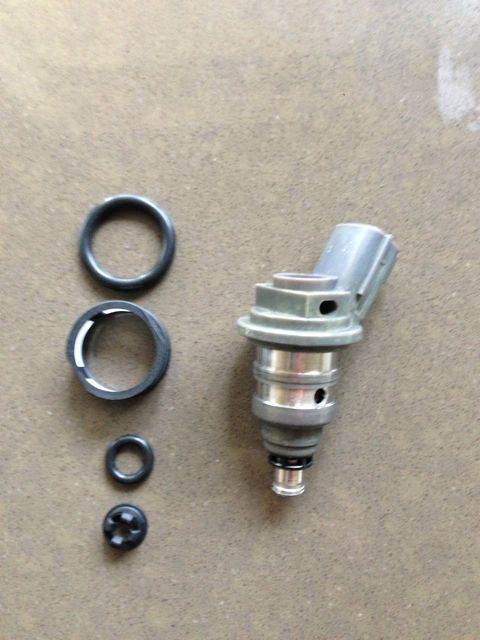
|
||
|
Danvillan » CMF Member Mulgoa Australia Member since: Posts: |
Re: The DIY turbo build thread - Page 3 |
Thu 27 Jun 2013 08:02:16 PM |
|
Cleaned and rebuilt injectors.
|
||
Image Attached:
|
||
|
Danvillan » CMF Member Mulgoa Australia Member since: Posts: |
Re: The DIY turbo build thread - Page 3 |
Thu 27 Jun 2013 08:03:52 PM |
|
installed into the modified sr20 fuel rail. With the new o-rings the injectors are hard to re-install. So use a bit of wd40 on the o-rings then place the injector cap onto the fuel rail and screw them down, that will push them down very easy (might sound like common sense but it took me half an hour of trying to push them in by hand and failing to figure it out. lol)
|
||
Image Attached: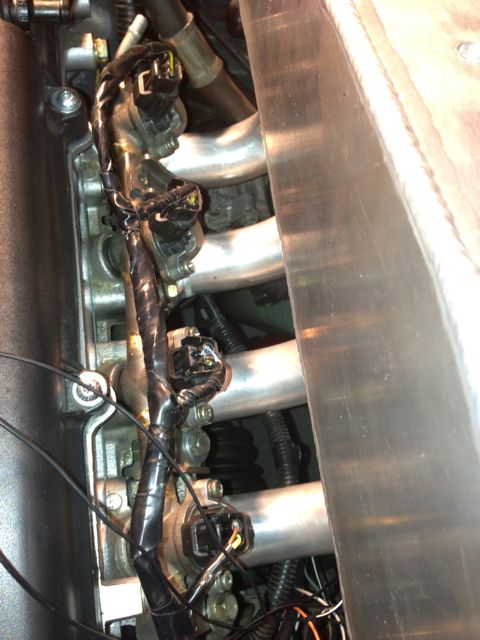
|
||
|
Danvillan » CMF Member Mulgoa Australia Member since: Posts: |
Re: The DIY turbo build thread - Page 3 |
Thu 27 Jun 2013 08:06:59 PM |
|
Relocating the battery to under the front seat. Cut the fuse boxes mounting brackets off the battery tray and welded them to the side engine bay.
|
||
Image Attached: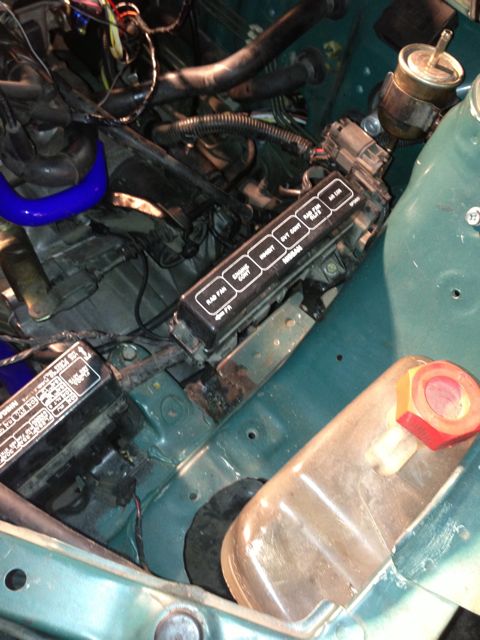
|
||
|
Danvillan » CMF Member Mulgoa Australia Member since: Posts: |
Re: The DIY turbo build thread - Page 3 |
Thu 27 Jun 2013 08:20:56 PM |
|
Also welded the fuel filter holder to the side of the engine bay to make room for the plenum and piping. Behind that you can see the grommet used to run the battery wire into the cabin (circled in red).
|
||
Image Attached: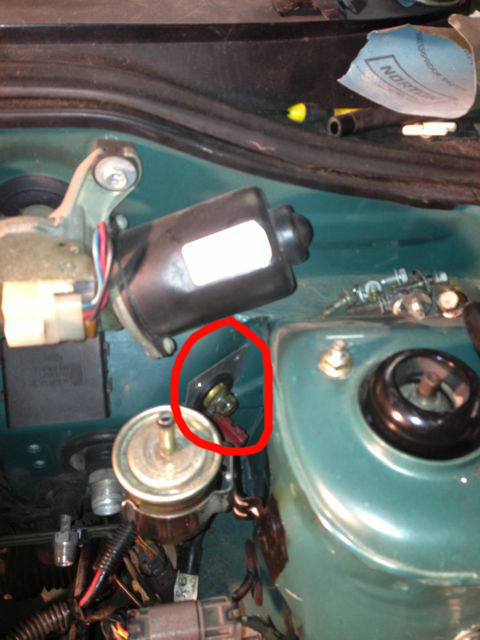
|
||
|
Tinky » CMF Member Currumbin Waters Australia Member since: Posts: |
Re: The DIY turbo build thread - Page 3 |
Thu 27 Jun 2013 08:24:39 PM |
|
Go Dan :) what's the blue goo ?
|
||
|
Danvillan » CMF Member Mulgoa Australia Member since: Posts: |
Re: The DIY turbo build thread - Page 3 |
Thu 27 Jun 2013 08:40:21 PM |
|
Started the task of wiring the ECU up. Running the stinger side by side with the stock ECU. Stinger for the engine and Stock ECU for the power steering, air con (if I later hook it up) etc, etc.
I'm winging it big time and will need to get it checked over before starting her up for sure. That being said it's much like a bigger more confusing car stereo. The wiring to the ignition/distributor has me stumped. Also had to get a new wideband sensor to run with the stinger rather than the stock o2 sensor. Got the SR20 TB on the plenum with the TPS hooked up. Also need a air temp sensor (probably just use a GM one off some Holden) don't know if I should tap it into the plenum or into the intercooler piping just prior to the TB, any thoughts? Nearly done just wondering what I should run off the outputs, the engine temp is controlled by the stinger therefore I will need one output for the fan, right? How about the fuel pump? I would appreciate any input in relation to this wiring job, especially the distributor/ignition |
||
Image Attached: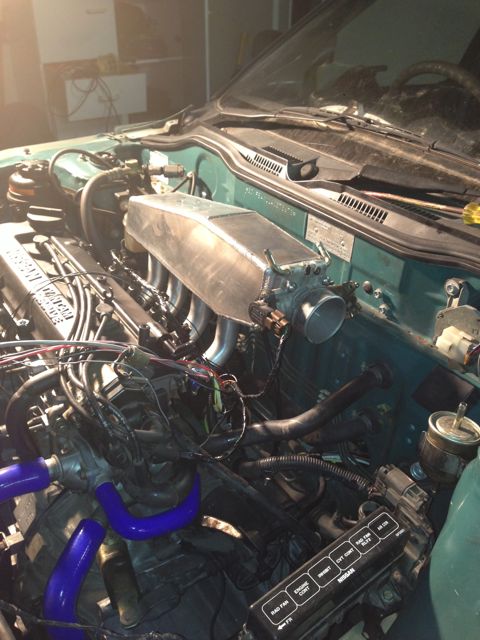
|
||
|
Danvillan » CMF Member Mulgoa Australia Member since: Posts: |
Re: The DIY turbo build thread - Page 3 |
Thu 27 Jun 2013 08:43:19 PM |
|
Tinky, I'm guessing you're referring to the blue silicone hoses. You can see them better in this photo ^^^^^^^^^.
They fit well and were only $25 off eBay with free postage (from China so we'll see how long they last) |
||
|
frank2 » CMF Member birmingham United Kingdom Member since: Posts: |
Re: The DIY turbo build thread - Page 3 |
Thu 27 Jun 2013 10:44:49 PM |
|
going by the ecu pinout, this is the resistor for the coil dan, and the transistor is inside the dizzy iirc
have you got the pre-nats wiring diag btw ? ambient air temp sensor in the chargepipe maybe ? |
||
Image Attached: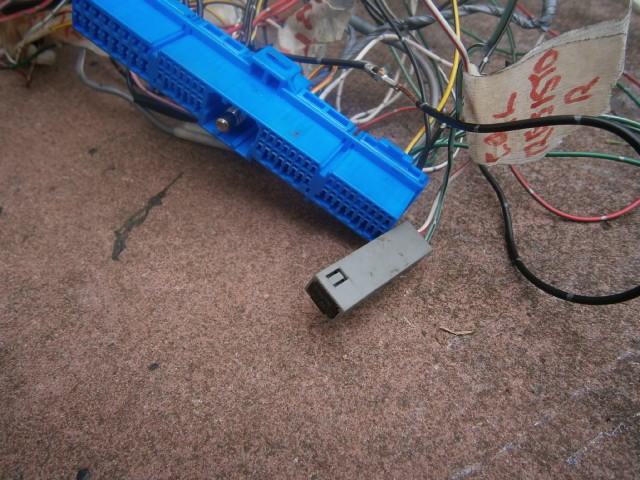
|
||
|
frank2 » CMF Member birmingham United Kingdom Member since: Posts: |
Re: The DIY turbo build thread - Page 3 |
Fri 28 Jun 2013 07:47:33 PM |
|
frank2 WROTE: have you got the pre-nats wiring diag btw ? " re-sized a snapshot :) |
||
Image Attached: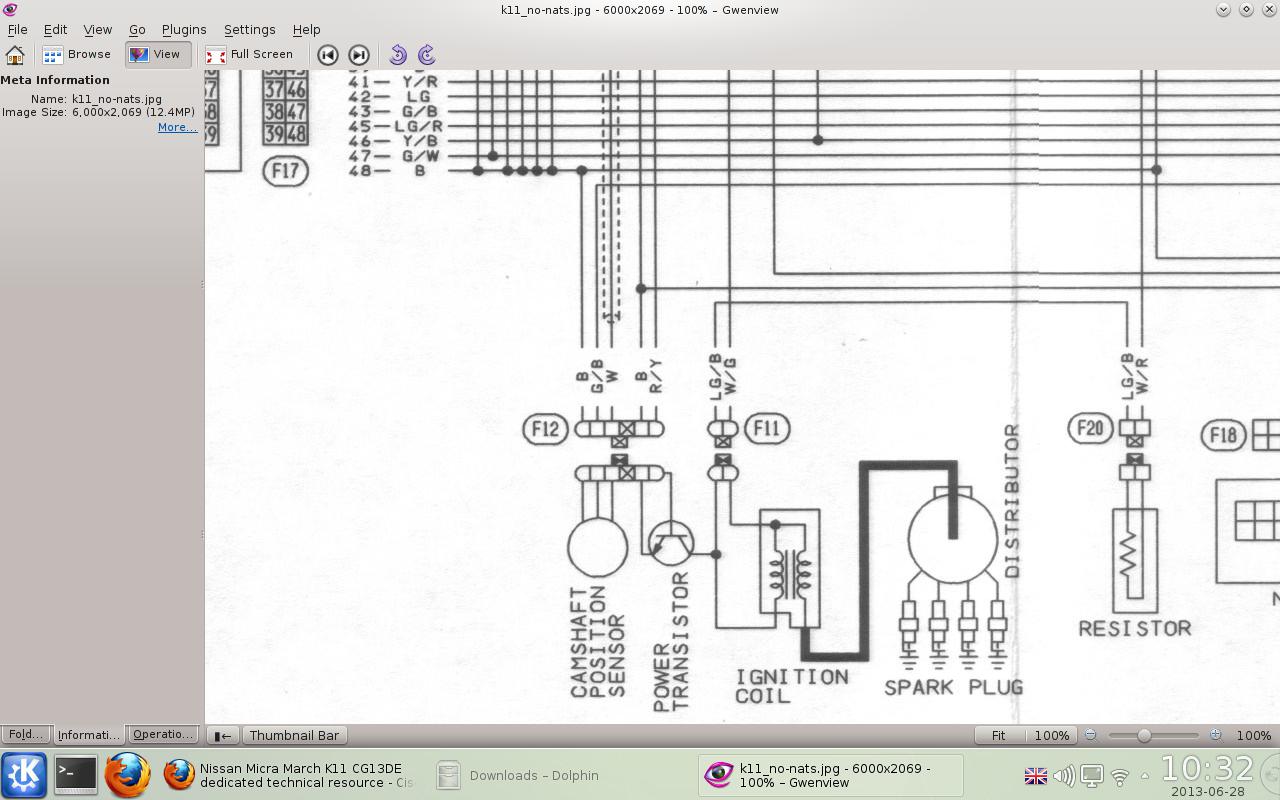
|
||
|
Danvillan » CMF Member Mulgoa Australia Member since: Posts: |
Re: The DIY turbo build thread - Page 3 |
Fri 28 Jun 2013 07:47:46 PM |
|
Sorry Frank, No sure what you mean by Pre-nats wiring diagram???? But the Haynes wiring diagram seem to be different to mine, well the colour of the wiring is anyway.
These are the two plugs into the distributor, the two wire loom is to the power transistor (i believe) but the wires don't lead back to the ECU they branch off to another loom not exactly sure where that loom goes to or how it will be wired to the Stinger. The other 5 wire loom = Im guessing the red one is the positive power, the two blacks are ground, not sure what the shielded brown/white and green wires are. Below that is the Haynes wiring diagram. |
||
Image Attached: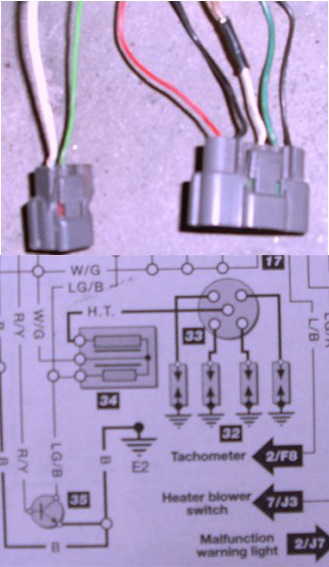
|
||
|
frank2 » CMF Member birmingham United Kingdom Member since: Posts: |
Re: The DIY turbo build thread - Page 3 |
Fri 28 Jun 2013 07:50:32 PM |
|
heh, we posted together dan :) ^
|
||
|
Danvillan » CMF Member Mulgoa Australia Member since: Posts: |
Re: The DIY turbo build thread - Page 3 |
Fri 28 Jun 2013 07:59:10 PM |
|
This is the stinger diagram. I can't remember which wire I don't need either the sync or trigger (I was told by the guy at EMS that you don't need one as the rotor button does the job of either the sync or trig can't remember).
So the red wire from the above loom should be +12v Theres only 1 ground to the stinger but 2 from the micra loom, not sure if I can go 2 into 1. And this is where I'm getting confused. 1 pink Ign1 wire has to go to the coil (which ever wire that is?). The sync or trigger has to go to either somewhere in that loom. And how the power transistor fits into this has really got me stuffed, I've had a decent crack at it but I might have to bite the bullet and pay an auto electrician to finish the wiring. |
||
Image Attached:
|
||
|
Danvillan » CMF Member Mulgoa Australia Member since: Posts: |
Re: The DIY turbo build thread - Page 3 |
Fri 28 Jun 2013 08:03:00 PM |
|
Thanks Frank, Yeah different wiring diagram than mine but still no clearer to me, lol.
|
||
|
frank2 » CMF Member birmingham United Kingdom Member since: Posts: |
Re: The DIY turbo build thread - Page 3 |
Fri 28 Jun 2013 08:05:05 PM |
|
i have yet to see 2 k11,s with the same colour wires dan ! on my pre-nats loom that i tagged all the wires on, there are 4 or 5 white shielded wires (maf/tps/cts etc), and they are all input signal wires (shielded from spurious interference) and they all have their own earths back to the ecu (for similar reasons)
my understanding is that the (weak) optical signal is sent to the ecu, and the computed signal is sent back to the coil (with the current jacked up by the power tansistor and resistor ?) |
||
|
Danvillan » CMF Member Mulgoa Australia Member since: Posts: |
Re: The DIY turbo build thread - Page 3 |
Sat 29 Jun 2013 03:39:01 PM |
|
Test fit of the bad boy bonnet, wald front bar and modified grill.
|
||
Image Attached: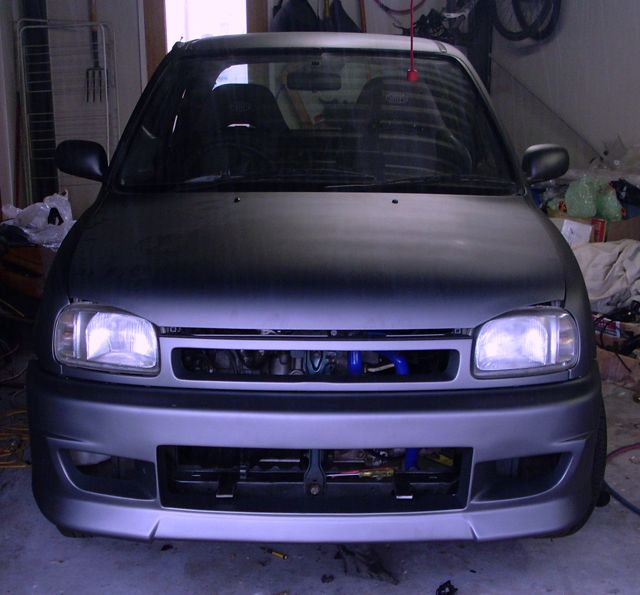
|
||
|
frank2 » CMF Member birmingham United Kingdom Member since: Posts: |
Re: The DIY turbo build thread - Page 3 |
Sat 29 Jun 2013 04:31:19 PM |
|
lookin good dan :)
i think the power steering and aircon inputs to the stock ecu are only for the idle control btw (as are the heater motor and rear demister inputs) i can email that diag if you want (1.9mb) |
||
|
Danvillan » CMF Member Mulgoa Australia Member since: Posts: |
Re: The DIY turbo build thread - Page 3 |
Sat 29 Jun 2013 05:57:21 PM |
|
Yeah, that would be good frank, you can email me at danvillan78@gmail.com , thanks.
|
||
|
Danvillan » CMF Member Mulgoa Australia Member since: Posts: |
Re: The DIY turbo build thread - Page 3 |
Sun 30 Jun 2013 01:28:15 PM |
|
I was worries about the turbo sitting so close to the JDM cam cover (being plastic), so I thought I would have to use to AU cam cover (alloy). Didn't want to paint it either just in case the paint peels from the heat. Decided to polish up the old cam cover which was a bit dirty.
I had an old metal polishing kit that I bought from Bunnings a while back. Used a wire wheel to knock of the bulk of the dirty off then use the two compounds and polishing wheel to clean it up. Picture of before and after. |
||
Image Attached: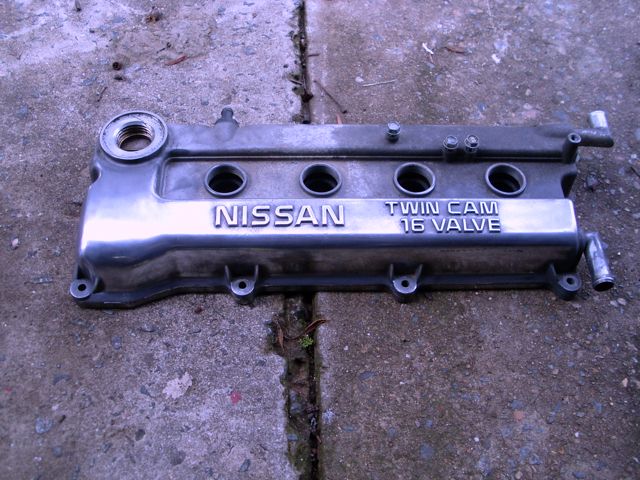
|
||
|
Danvillan » CMF Member Mulgoa Australia Member since: Posts: |
Re: The DIY turbo build thread - Page 3 |
Sun 30 Jun 2013 01:32:12 PM |
|
Didn't end up with a mirror finish but a lot neater than the old dirty cover.
Should be ok once I get the turbo and manifold ceramic coated. Only other drama is the turbo sitting really close to the underside of the bonnet. I think it's going to cook the paint off. I'll probably make a heat shield fixed to the underside of the bonnet, theres only about 20mm between the turbo and the bonnet. |
||
Image Attached: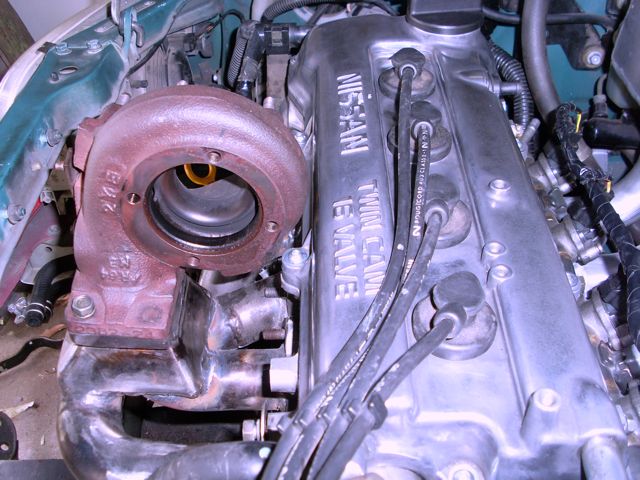
|
||
|
Danvillan » CMF Member Mulgoa Australia Member since: Posts: |
Re: The DIY turbo build thread - Page 3 |
Fri 05 Jul 2013 07:51:14 PM |
|
Relocated the carbon canister to keep Mother Nature and the RTA happy. There is limited room in the engine bay even with the battery removed. Looking around I decided that I would mount it just under the passenger side headlight which will be cover by the front bumper bar.
Drilled and tapped a couple of hole in the chassis rail. Mounted the bracket which fitted nicely and out of sight. |
||
Image Attached: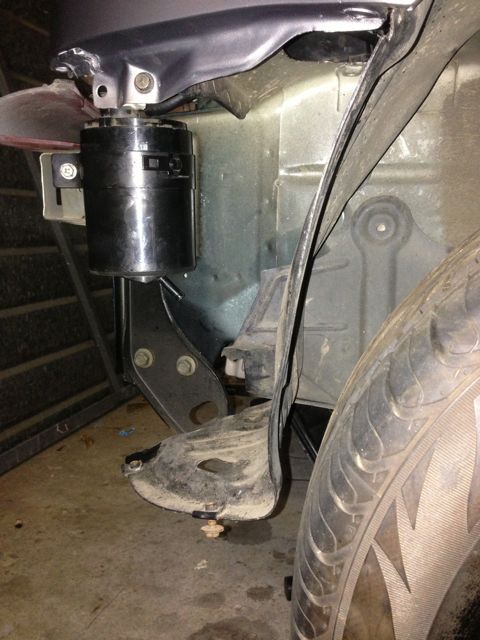
|
||
|
Danvillan » CMF Member Mulgoa Australia Member since: Posts: |
Re: The DIY turbo build thread - Page 3 |
Fri 05 Jul 2013 07:54:36 PM |
|
Ran the vacuum lines and vapour lines through the headlight hole into the engine bay.
Pretty happy with the location as it keeps the stock emission controls without cluttering the engine bay. |
||
Image Attached: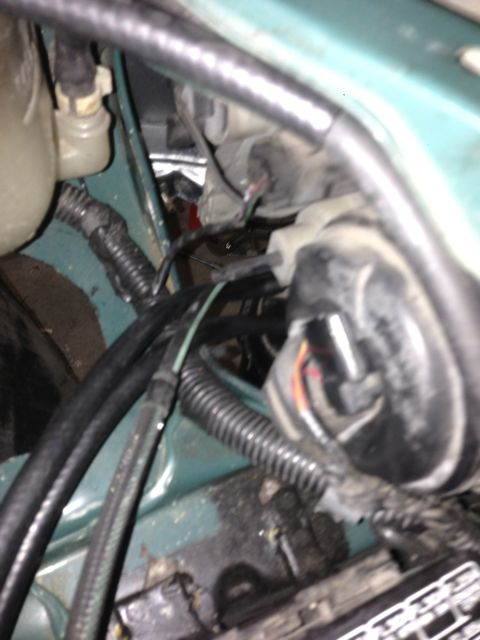
|
||
|
Tinky » CMF Member Currumbin Waters Australia Member since: Posts: |
Re: The DIY turbo build thread - Page 3 |
Sat 06 Jul 2013 10:19:42 AM |
|
Great work Dan ,did you get the wiring figured out?
|
||
|
Danvillan » CMF Member Mulgoa Australia Member since: Posts: |
Re: The DIY turbo build thread - Page 3 |
Sat 06 Jul 2013 02:00:49 PM |
|
Tinky, haven't got the wiring figured yet. Just mainly the ignition stuff, I'll get an auto electrician to sort it but I've got a few other things I need to sort out such as the Nismo JDM cluster which I'll need an electrician for as well.
|
||
Image Attached: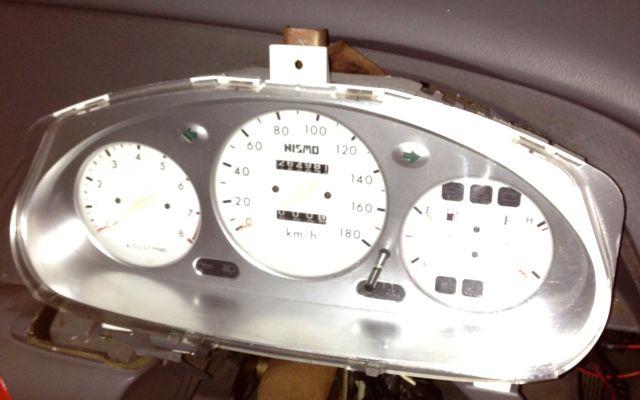
|
||
|
brewey » CMF Member Sydney Austria Member since: Posts: |
Re: The DIY turbo build thread - Page 3 |
Tue 16 Jul 2013 03:02:29 AM |
|
Danvillan where are you at I would like to
Have a look at your micra I have a turbo Micra to my name Chris and Live in The hawkesbury hope to have a look at you Micra Thanks |
||
Image Attached: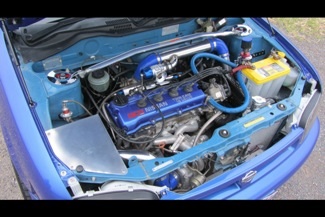
|
||
|
Danvillan » CMF Member Mulgoa Australia Member since: Posts: |
Re: The DIY turbo build thread - Page 3 |
Tue 16 Jul 2013 07:08:33 PM |
|
Hey Chris, I'm in Mulgoa not far from you. Inbox me if you want to hook up, wouldn't mind checking out your micra as well.
Update: Got my turbo manifold and exhaust housing back from being ceramic coated. I got it coated in ceracoat turbine coating which is supposed to be better at heat reduction (allegedly 30% heat reduction) but doesn't look as good as the chrome coating you can get. I'm more concerned about the heat reduction properties of the coating rather than the look. Still looks better than the mild steel steam pipe and rusty exhaust housing. |
||
Image Attached: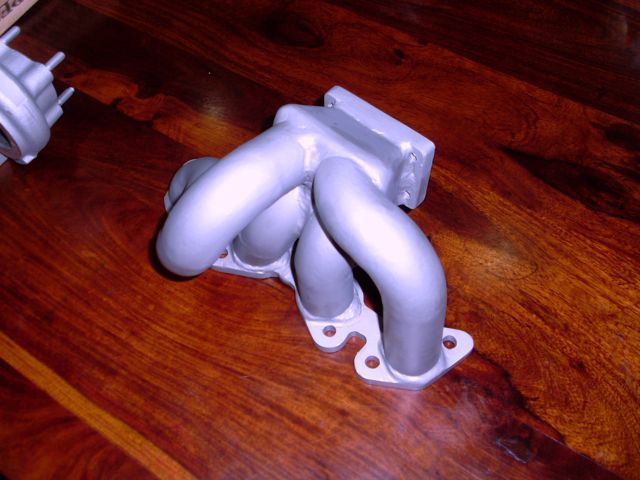
|
||
|
Danvillan » CMF Member Mulgoa Australia Member since: Posts: |
Re: The DIY turbo build thread - Page 3 |
Tue 16 Jul 2013 07:09:05 PM |
|
Exhaust housing
|
||
Image Attached: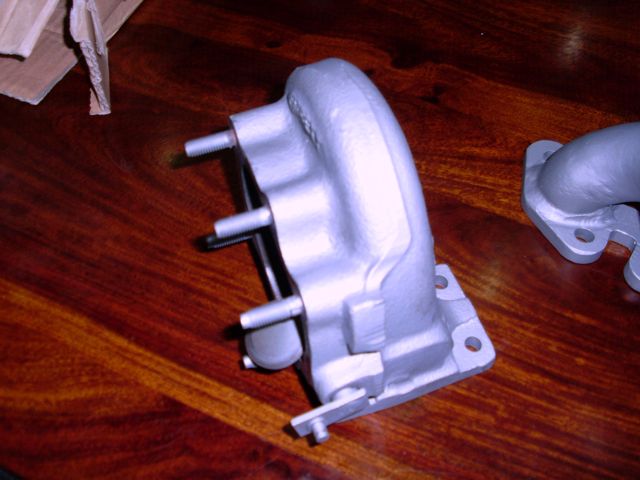
|
||
|
Danvillan » CMF Member Mulgoa Australia Member since: Posts: |
Re: The DIY turbo build thread - Page 3 |
Tue 16 Jul 2013 07:17:06 PM |
|
Got a new Apexi intercooler (or a chinese copy of one who can tell these days). For the price I paid I think it probably is a copy. Should do the trick anyway.
The 600mm intercooler I had was going to be too difficult to plumb the pipes to, so I had to get a 450mm one for easier install. Also wanted smaller inlet/outlet pipe 2 inch to match the intercooler pipe rather than the 2.5 inch one I had. I think 2.5 inch piping will be too laggy. |
||
Image Attached: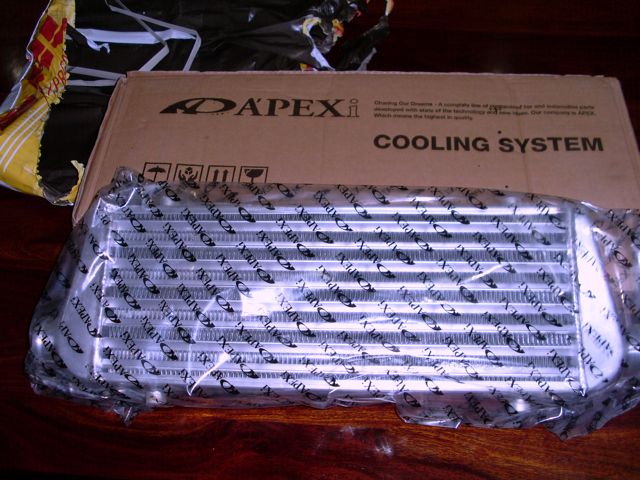
|
||
|
Danvillan » CMF Member Mulgoa Australia Member since: Posts: |
Re: The DIY turbo build thread - Page 3 |
Thu 18 Jul 2013 08:32:47 PM |
|
Installed the oil cooler. Just used some self tapping screws into the radiator support rail with a couple of rubber grommets under it to stop the vibration.
I've got another one coming which I will mount next to the oil cooler. I'm going to use it as another radiator from the turbo, to cool the coolant down a bit before returning it to the motor. |
||
Image Attached: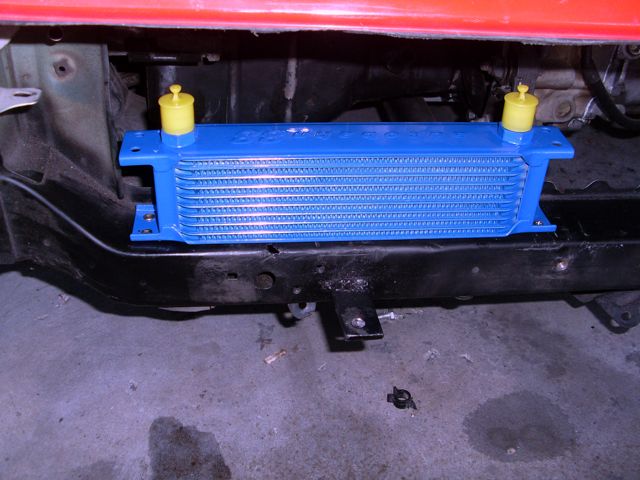
|
||
|
Danvillan » CMF Member Mulgoa Australia Member since: Posts: |
Re: The DIY turbo build thread - Page 3 |
Thu 18 Jul 2013 08:35:13 PM |
|
Installed the intercooler. Had to weld a couple of tabs to the radiator support, then used a rubber grommet between the bracket and intercooler.
|
||
Image Attached: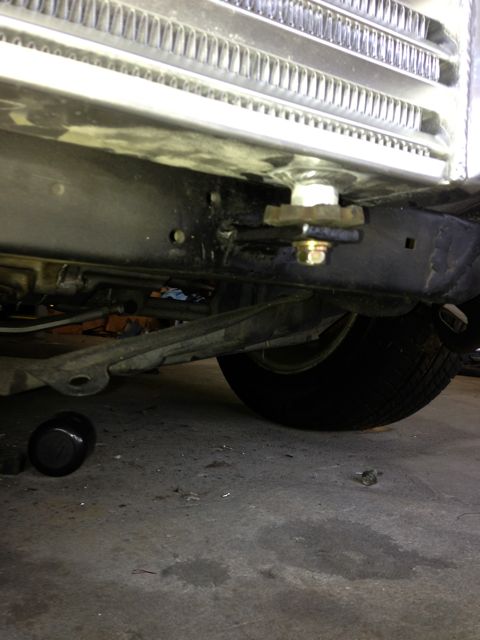
|
||
|
Danvillan » CMF Member Mulgoa Australia Member since: Posts: |
Re: The DIY turbo build thread - Page 3 |
Thu 18 Jul 2013 08:38:00 PM |
|
Removed the support brace between the upper and lower radiator support and welded a piece of Aluminium to the intercooler to act as the support brace.
First attempt at welding Aluminium, bit rough but no one will see it. |
||
Image Attached: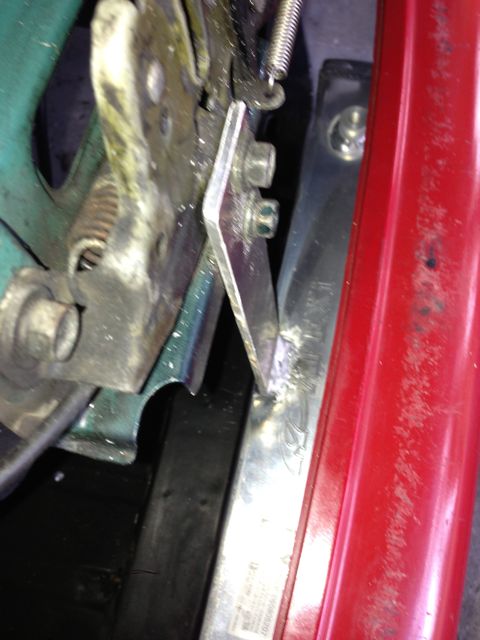
|
||
|
Danvillan » CMF Member Mulgoa Australia Member since: Posts: |
Re: The DIY turbo build thread - Page 3 |
Thu 18 Jul 2013 08:45:52 PM |
|
Finished look.
I was hoping for something a bit more subtle, well at least something that doesn't scream "I'm turbocharged". I failed ;) |
||
Image Attached: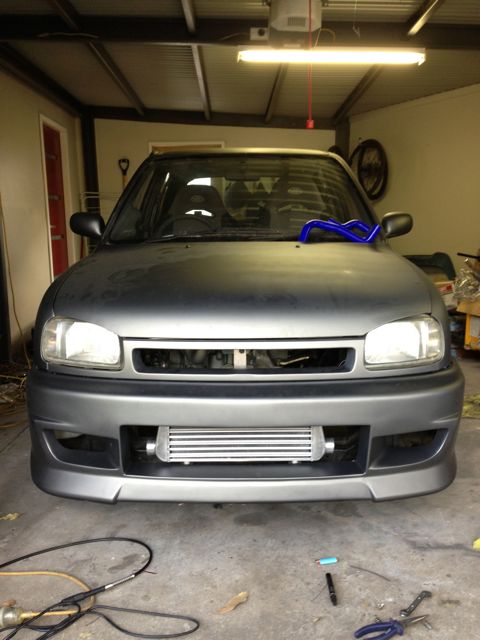
|
||
|
Danvillan » CMF Member Mulgoa Australia Member since: Posts: |
Re: The DIY turbo build thread - Page 3 |
Thu 18 Jul 2013 08:51:41 PM |
|
Started to weld the exhaust up. First time using a TIG welder butchered the first couple of joints but I'm slowly getting better.
This would be heaps easier with a hydraulic lift and a extra pair of hands but getting it done slowly. |
||
Image Attached: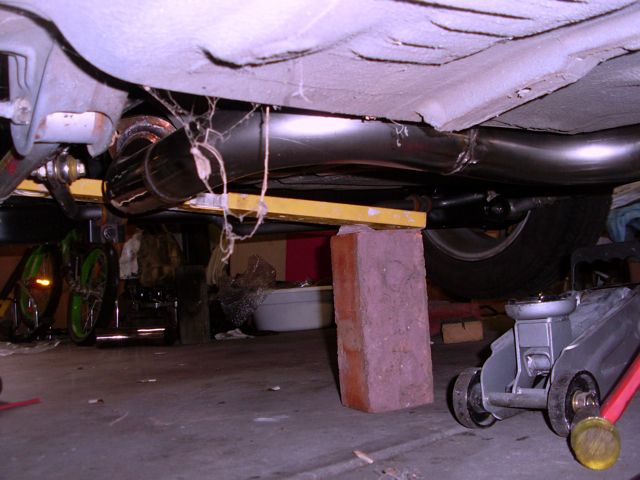
|
||
|
AB-NRML » CMF Member Perth Australia Member since: Posts: |
Re: The DIY turbo build thread - Page 3 |
Fri 19 Jul 2013 12:10:16 AM |
|
If you can get a foot pedal control for your tig welder I think you'll find it a lot easier.. just like using an accelerator..
loving this build thread.. hoping I can show everyone as much as you do when I supercharge mine. I forget to take pictures of the work I do so thanks for sharing.. |
||
|
Tyrie » CMF Member Canberra Australia Member since: Posts: |
Re: The DIY turbo build thread - Page 3 |
Sun 21 Jul 2013 04:13:14 PM |
|
Interesting that the ring lands were cracked in my old block. No evidence of that with the engine running!
Interesting that you're going with the old school thick copper gasket and O-rings. Was very popular in the 90's but I haven't seen anyone doing it in the last few years. If you're going with a forged bottom end I'd be looking to get the highest compression ratio reasonably possible and tuning it on e-flex. I'm copying your injector clean/refurb now, new injectors are frigging expensive when you need 8 of them :p |
||
|
Danvillan » CMF Member Mulgoa Australia Member since: Posts: |
Re: The DIY turbo build thread - Page 3 |
Wed 24 Jul 2013 07:47:46 PM |
|
Hey Tye, I was a bit concerned when i saw the ringlands and thought about get forged bottom end but decided against it mainly due to the price. Hopefully the lower compression will reduce the detonation. Just hoping the copper gasket seals properly.
Update: Had to modify the dump pipe I bought to fit my application. I needed to get the right downward angle from the turbo so I welded a 50mm extension between the flange and dump pipe at the right angle. I then reduced the 3inch pipe to 2.5 inch to suit the rest of the system. I know the welds are a bit rough but I'll heat wrap it so it won't be seen. |
||
Image Attached: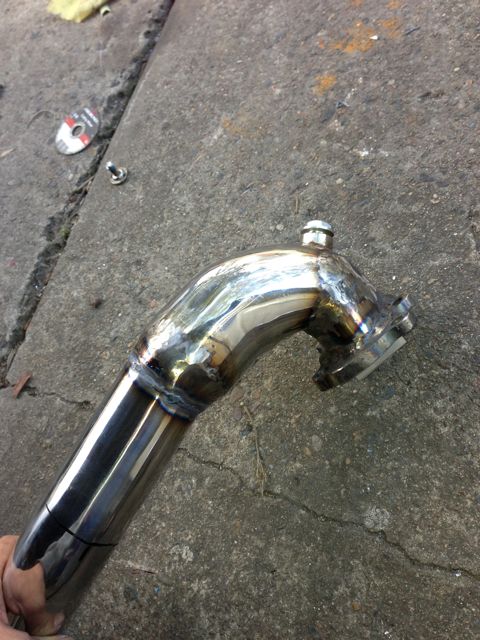
|
||
|
Danvillan » CMF Member Mulgoa Australia Member since: Posts: |
Re: The DIY turbo build thread - Page 3 |
Wed 24 Jul 2013 07:48:21 PM |
|
Test fit.
|
||
Image Attached: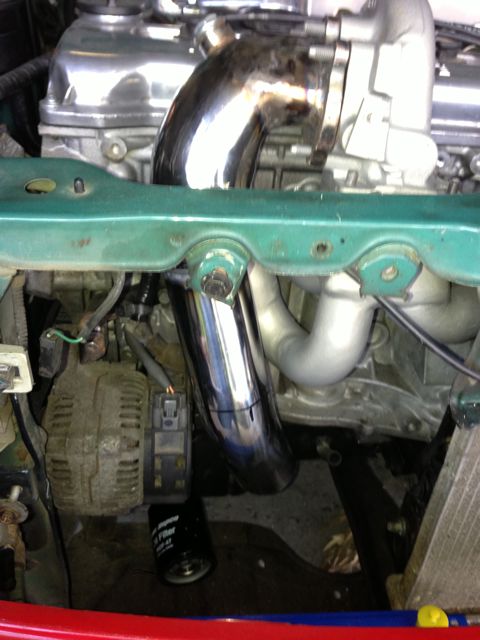
|
||
|
Danvillan » CMF Member Mulgoa Australia Member since: Posts: |
Re: The DIY turbo build thread - Page 3 |
Wed 24 Jul 2013 07:49:28 PM |
|
Rear section and muffler welded up just need to weld the hangers on.
|
||
Image Attached: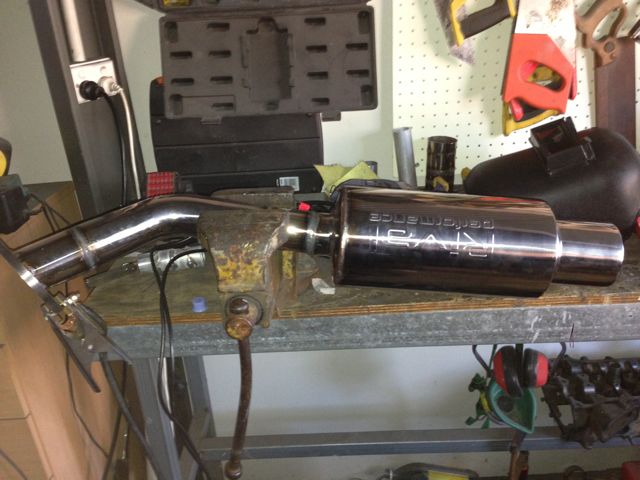
|
||
|
Danvillan » CMF Member Mulgoa Australia Member since: Posts: |
Re: The DIY turbo build thread - Page 3 |
Wed 24 Jul 2013 07:51:07 PM |
|
Odyssey PC680 drycell battery delivered toady
|
||
Image Attached: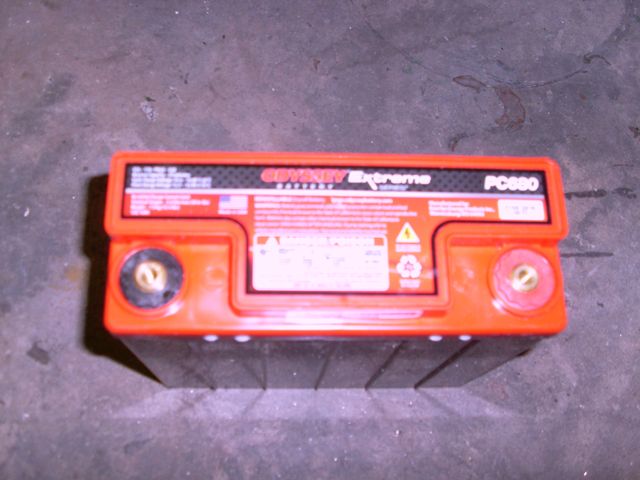
|
||
|
Danvillan » CMF Member Mulgoa Australia Member since: Posts: |
Re: The DIY turbo build thread - Page 3 |
Wed 24 Jul 2013 07:59:09 PM |
|
I'm concerned about the under bonnet heat with the high mount turbo setup so order a pair of Ford Focus RS bonnet vent. Just need to paint and install. Should help reduce the under bonnet heat.
|
||
Image Attached: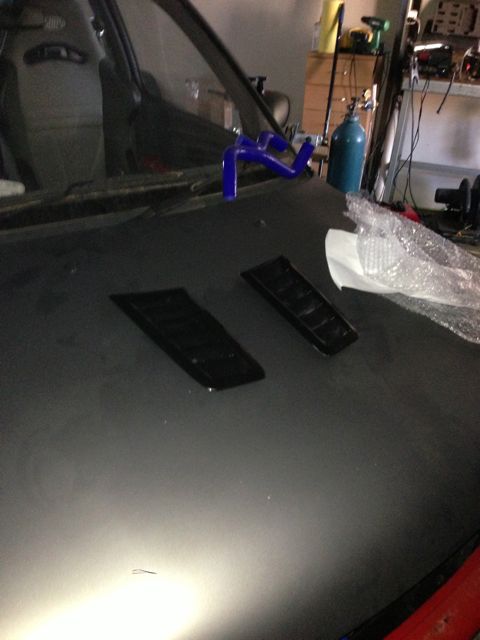
|
||
|
brewey » CMF Member Sydney Austria Member since: Posts: |
Re: The DIY turbo build thread - Page 3 |
Fri 26 Jul 2013 03:57:33 AM |
|
my car getting fix the head gasket went send me pm with your number and I text you when the car fixes
chris |
||
|
Danvillan » CMF Member Mulgoa Australia Member since: Posts: |
Re: The DIY turbo build thread - Page 3 |
Sat 27 Jul 2013 07:23:16 PM |
|
Painted the rear Super S spoiler and the bonnet vents.
|
||
Image Attached: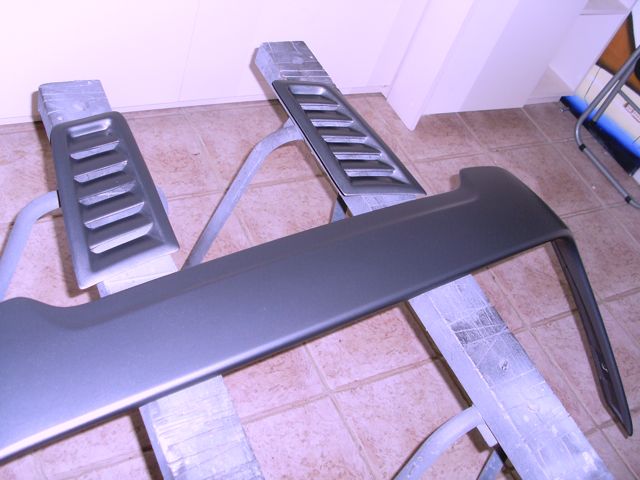
|
||
|
Danvillan » CMF Member Mulgoa Australia Member since: Posts: |
Re: The DIY turbo build thread - Page 3 |
Sat 27 Jul 2013 07:27:00 PM |
|
Had to modify the turbo compressor housing outlet so I could fit a silicon joiner on it. Just used some 44mm pipe cut at angles. Had to cut the T25 outlet flange off. Still practicing my aluminium welding little rough but it should do the trick.
|
||
Image Attached: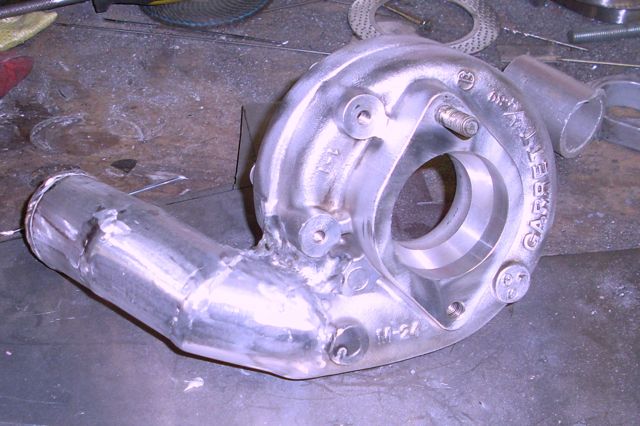
|
||
|
Danvillan » CMF Member Mulgoa Australia Member since: Posts: |
Re: The DIY turbo build thread - Page 3 |
Sat 27 Jul 2013 07:27:01 PM |
|
Had to modify the turbo compressor housing outlet so I could fit a silicon joiner on it. Just used some 44mm pipe cut at angles. Had to cut the T25 outlet flange off. Still practicing my aluminium welding little rough but it should do the trick.
Also gave it a clean with a wire wheel while I was at it. |
||
|
Danvillan » CMF Member Mulgoa Australia Member since: Posts: |
Re: The DIY turbo build thread - Page 3 |
Sat 27 Jul 2013 07:29:41 PM |
|
Turbo rebuilt and installed.
Its a tight fit I must say, had to move the upper radiator support forward a bit so the turbo would clear. |
||
Image Attached: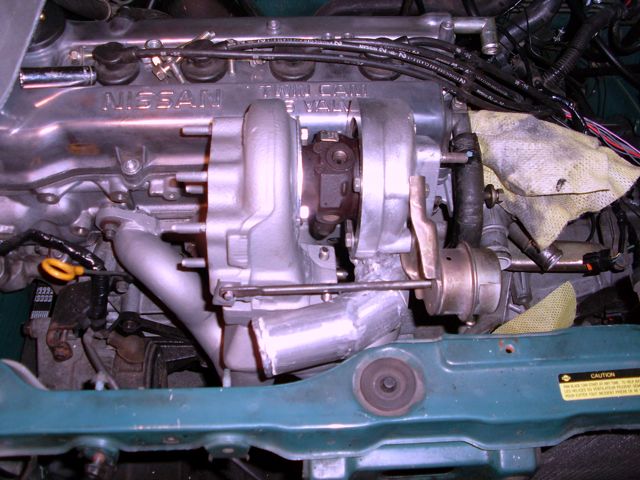
|
||
|
frank2 » CMF Member birmingham United Kingdom Member since: Posts: |
Re: The DIY turbo build thread - Page 3 |
Sun 28 Jul 2013 08:44:57 AM |
|
lookin good dan :) gonna be fired up soon ?
|
||
|
Danvillan » CMF Member Mulgoa Australia Member since: Posts: |
Re: The DIY turbo build thread - Page 3 |
Sun 28 Jul 2013 12:08:07 PM |
|
Not too long now just intercooler piping/boost controller/BOV, finish the wiring, oil/water lines to turbo, oil cooler and after turbo water cooler, finish off the exhaust.
Well now that I think of it still a little while off. I reckon September/October. |
||
|
Danvillan » CMF Member Mulgoa Australia Member since: Posts: |
Re: The DIY turbo build thread - Page 3 |
Sun 28 Jul 2013 08:33:59 PM |
|
Bonnet cut ready for the vents
|
||
Image Attached:
|
||
|
Danvillan » CMF Member Mulgoa Australia Member since: Posts: |
Re: The DIY turbo build thread - Page 3 |
Sun 28 Jul 2013 08:35:15 PM |
|
Test fit of bonnet vents
|
||
Image Attached: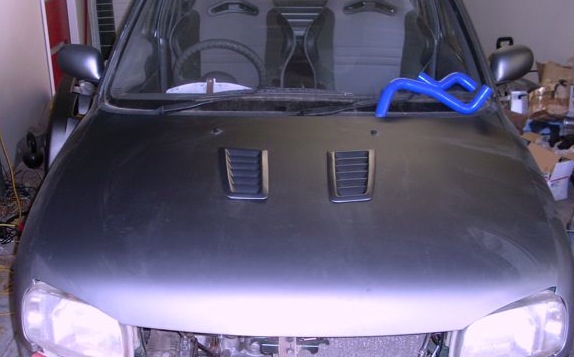
|
||
|
Danvillan » CMF Member Mulgoa Australia Member since: Posts: |
Re: The DIY turbo build thread - Page 3 |
Sun 28 Jul 2013 08:36:41 PM |
|
DIY $8 Turbo heat shield :
Bought a stainless steel pot for $8. |
||
Image Attached: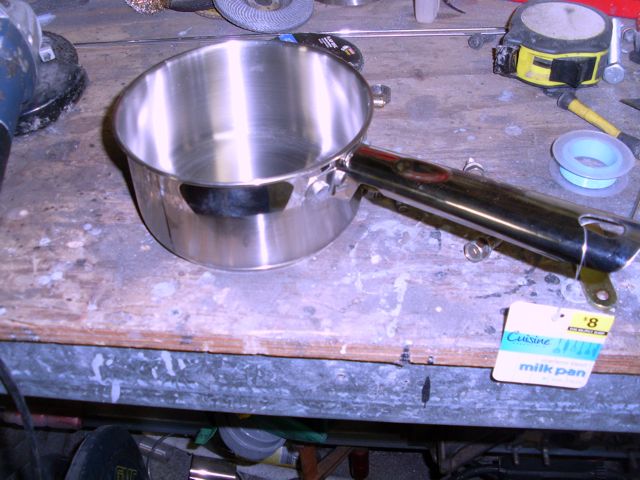
|
||
|
Danvillan » CMF Member Mulgoa Australia Member since: Posts: |
Re: The DIY turbo build thread - Page 3 |
Sun 28 Jul 2013 08:37:10 PM |
|
Cut the pot in half
|
||
Image Attached: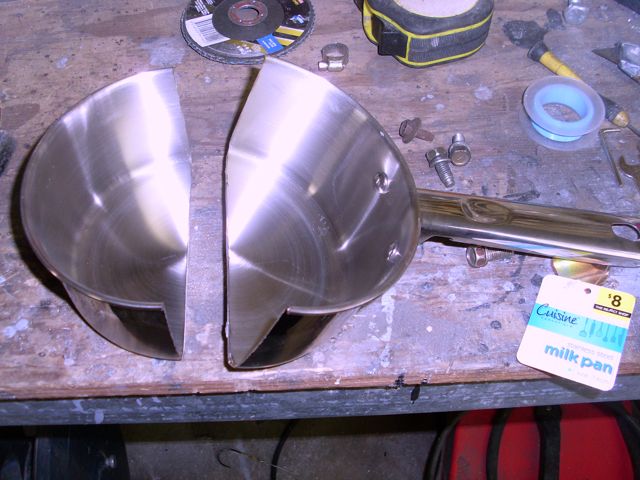
|
||
|
Danvillan » CMF Member Mulgoa Australia Member since: Posts: |
Re: The DIY turbo build thread - Page 3 |
Sun 28 Jul 2013 08:38:24 PM |
|
Made a templet out of cardboard to match the turbo exhaust flange
|
||
Image Attached: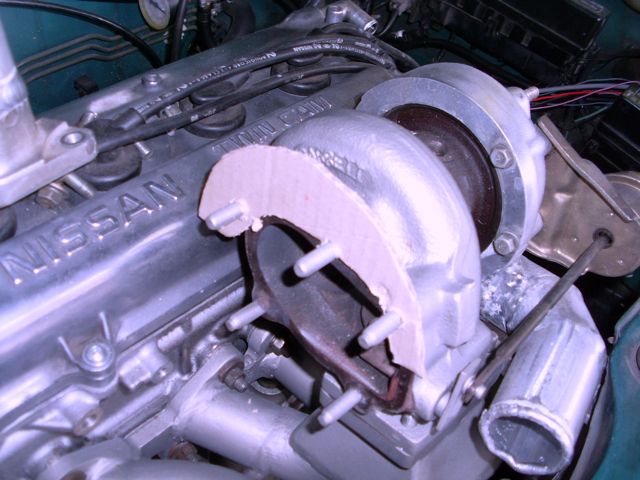
|
||
|
Danvillan » CMF Member Mulgoa Australia Member since: Posts: |
Re: The DIY turbo build thread - Page 3 |
Sun 28 Jul 2013 08:40:04 PM |
|
Half pot cut and drilled to match the flange and simple as that. $8 Stainless steel Turbo heat shield.
|
||
Image Attached: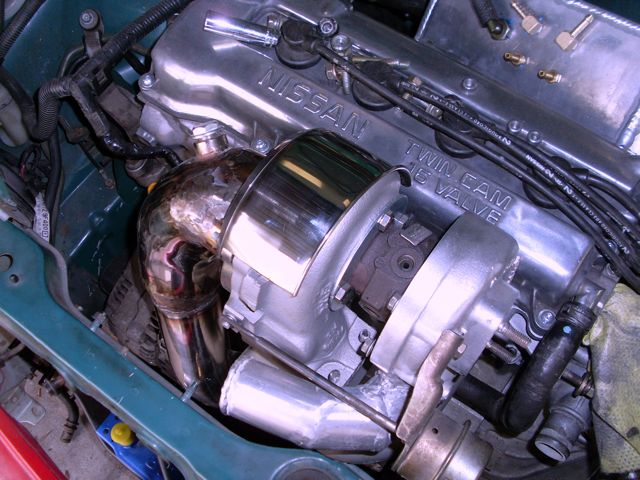
|
||
|
hotfunk67 » CMF Member Sydney Australia Member since: Posts: |
Re: The DIY turbo build thread - Page 3 |
Mon 29 Jul 2013 09:30:56 AM |
|
Thats genius and very cool.
|
||
|
DanielW » CMF Member Mount druitt Australia Member since: Posts: |
Re: The DIY turbo build thread - Page 3 |
Mon 29 Jul 2013 11:49:23 PM |
|
found this whilst working out my coil set-up. hope its what you need
|
||
Image Attached: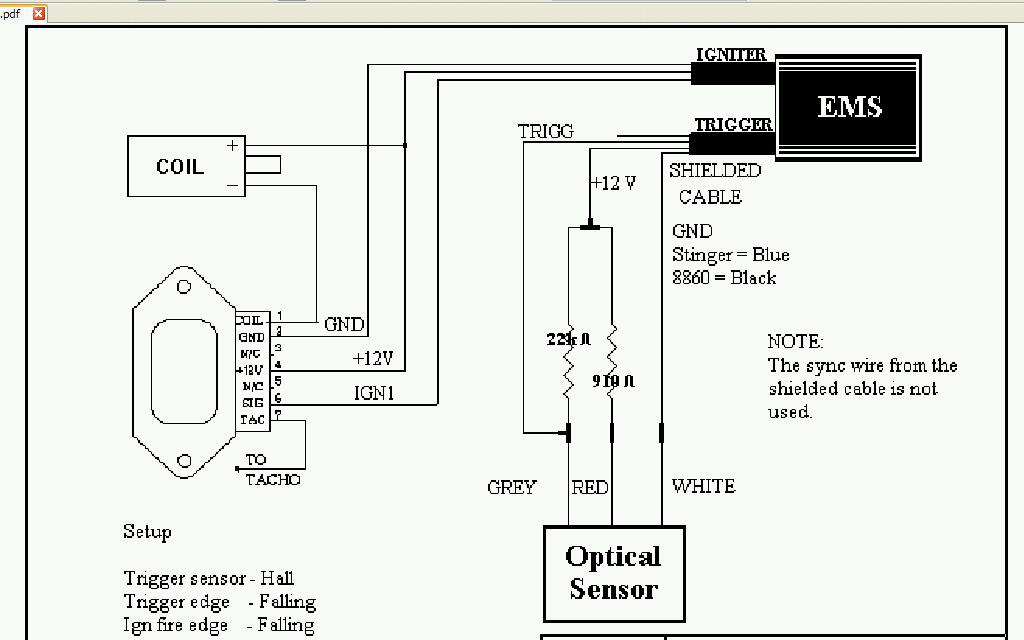
|
||
|
Danvillan » CMF Member Mulgoa Australia Member since: Posts: |
Re: The DIY turbo build thread - Page 3 |
Thu 01 Aug 2013 09:35:13 PM |
|
Gave the intercooler a real light coat of matt black paint (on the front only) to increase the stealthness of the car. I didn't really like the in your face intercooler (just asking for trouble).
A bit of black mesh on the bar and grill. I'm much happier now that the Micra isn't screaming "LOOK AT ME I"M TURBOCHARGED" Also fitted the bonnet vents with double sided tape and a bit of polyurethane |
||
Image Attached: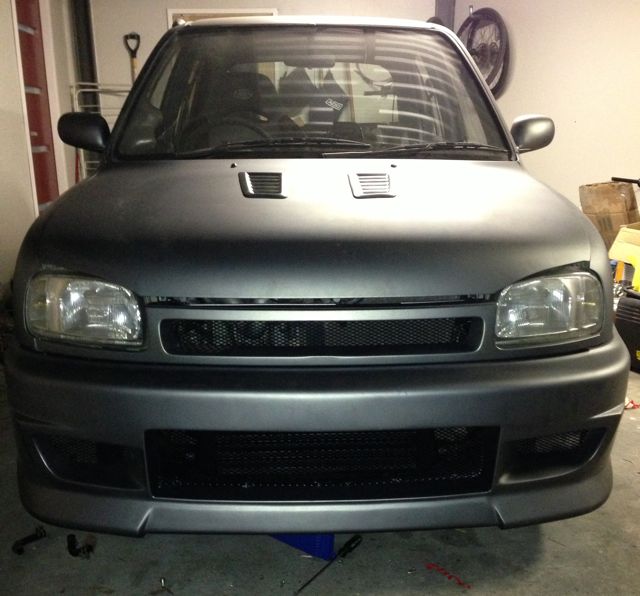
|
||
|
Danvillan » CMF Member Mulgoa Australia Member since: Posts: |
Re: The DIY turbo build thread - Page 3 |
Thu 01 Aug 2013 09:51:09 PM |
|
Mounted the battery and fuse, ready to be connect once I finish wiring the rest of the car.
|
||
Image Attached: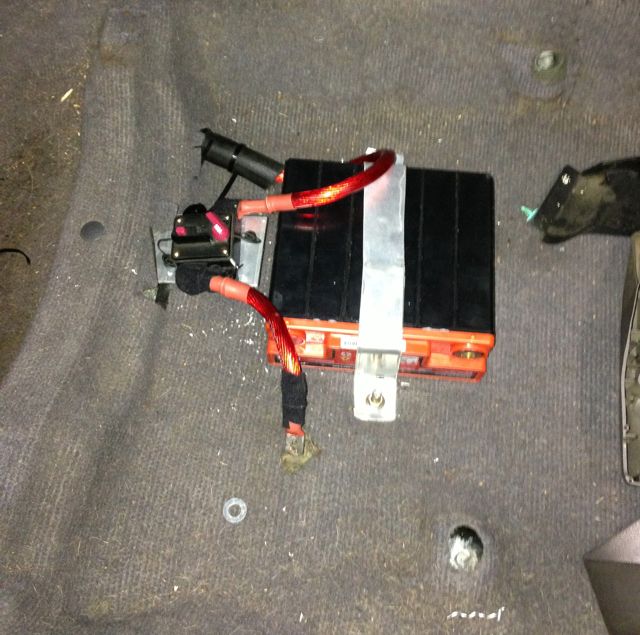
|
||
|
Pierce » CMF Member Logan Australia Member since: Posts: |
Re: The DIY turbo build thread - Page 3 |
Thu 01 Aug 2013 10:02:33 PM |
|
Definitely looks less suspect now, though it'll never be a sleeper with a body kit hehe,
|
||
|
DanielW » CMF Member Mount druitt Australia Member since: Posts: |
Re: The DIY turbo build thread - Page 3 |
Fri 02 Aug 2013 07:59:34 PM |
|
I dont even know where I found that diagram, I hope it wasn't on your thread. Lol. Did it help?
|
||
|
Danvillan » CMF Member Mulgoa Australia Member since: Posts: |
Re: The DIY turbo build thread - Page 3 |
Fri 02 Aug 2013 08:14:06 PM |
|
Not really sure if its applicable to my setup. I'm pretty clueless when it come to electrical stuff. If you sort your coil setup out then you might be able to help me out.
|
||
|
Seb » CMF Member France Member since: Posts: |
Re: The DIY turbo build thread - Page 3 |
Tue 06 Aug 2013 09:07:29 PM |
|
One onf my favorite build thread. Keep up the good work
cheers from France |
||
|
BigJohn » CMF Member Sydney Australia Member since: Posts: |
Re: The DIY turbo build thread - Page 3 |
Sun 22 Dec 2013 12:41:12 AM |
|
So what happened next?
|
||