Nissan micra power steering conversion
 |
 |
 |
 |
 |
 |
 |
 |
 |
 |
|
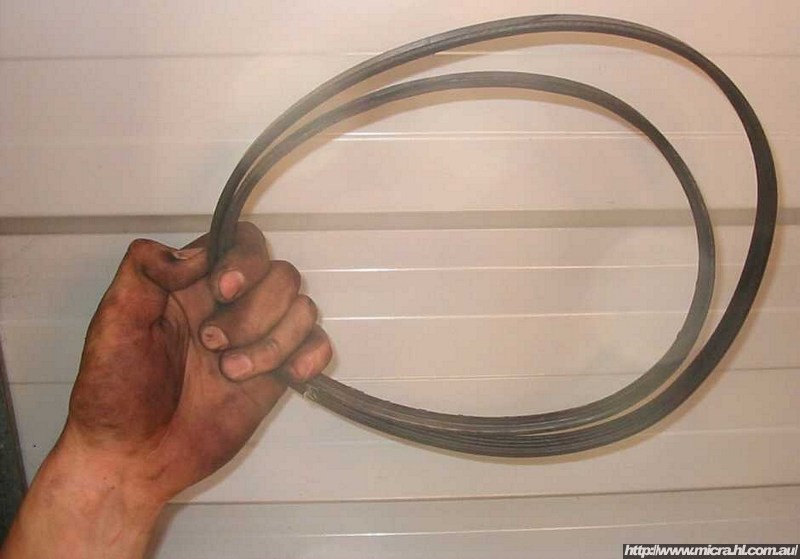
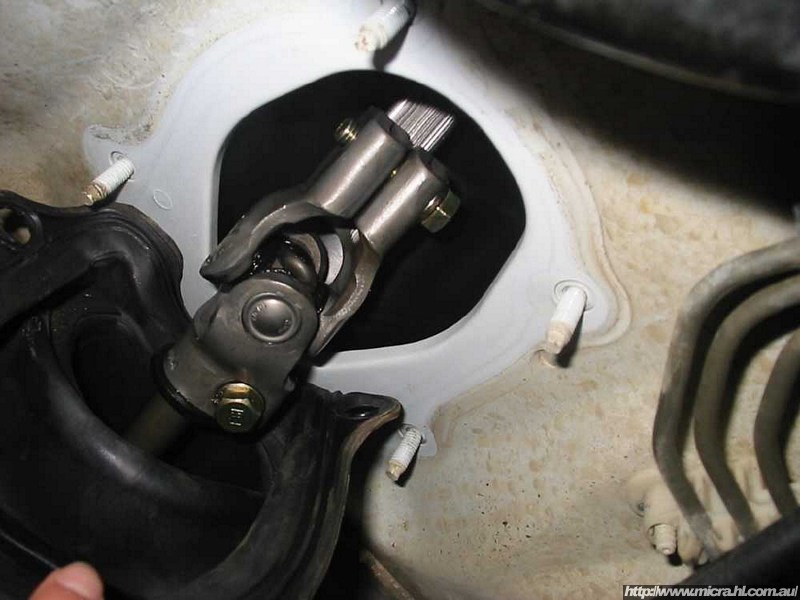
Recently I performed a power steering conversion on my 1995 micra LX 3 door. I am writing this article because I would've loved someone else to have this information already on the web before I did the conversion. Not that I had any major hiccups, but I could've done certain parts of the conversion quicker and more efficiently had I already been there and done that, or talked to somebody that had. It took me both days of a weekend to do, however now I reckon I could do the lot in a single day. IngredientsIf you want to attempt this yourself, you will need the following:
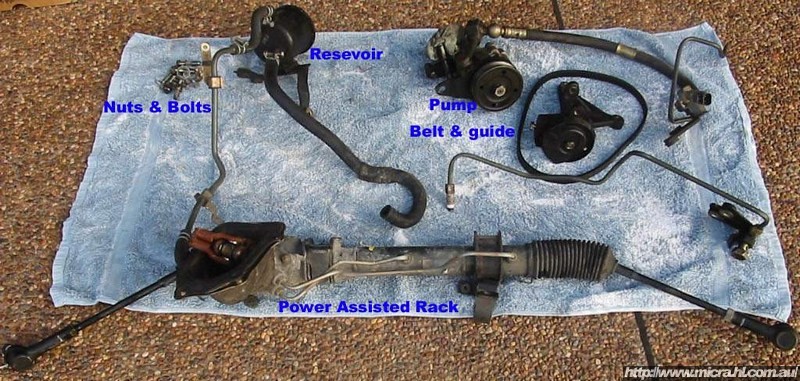
Now the parts, here we go from start to finish, they include:
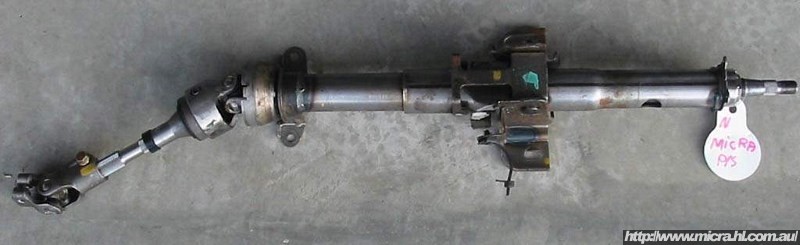
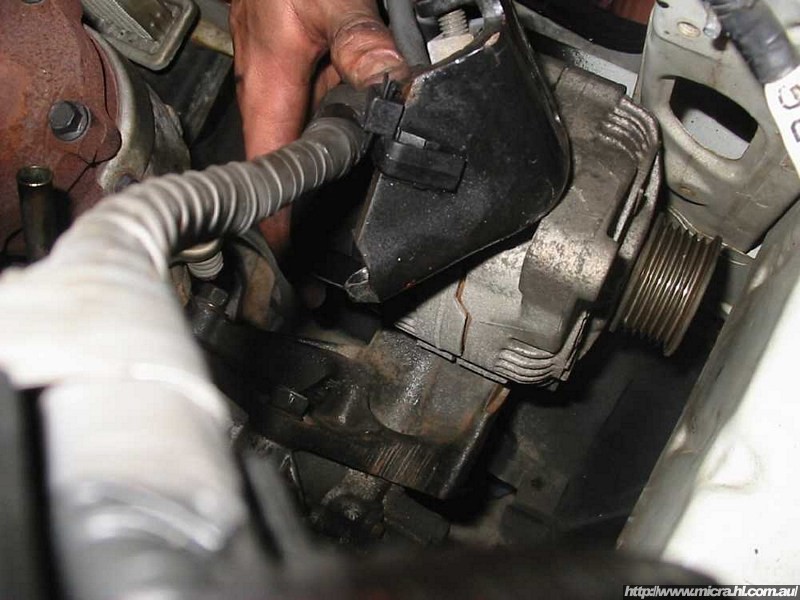
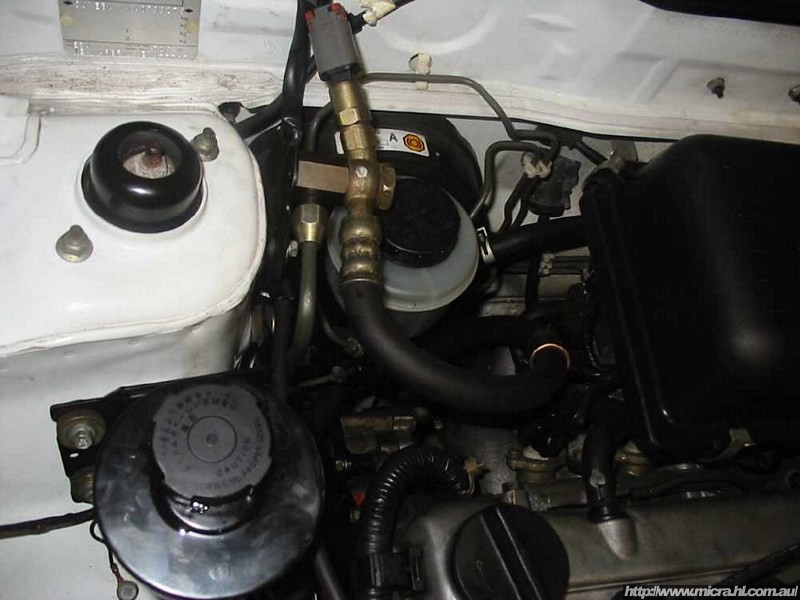
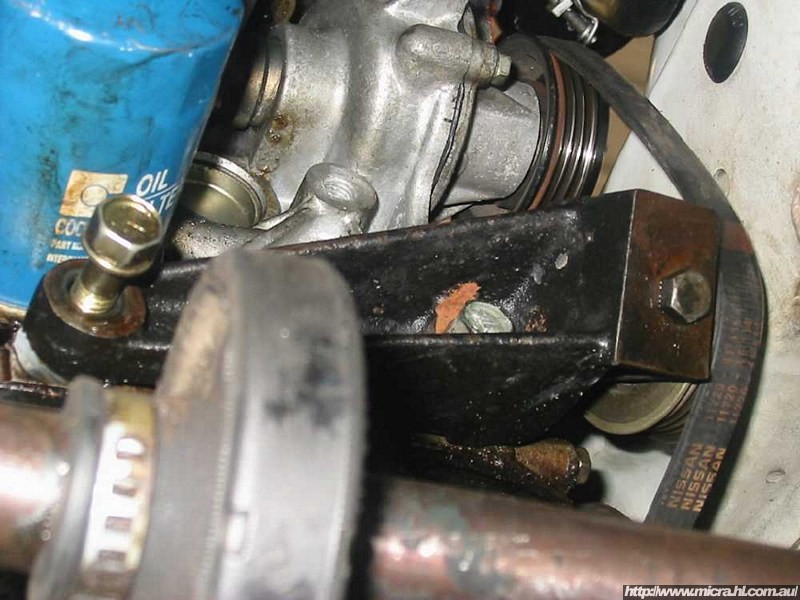
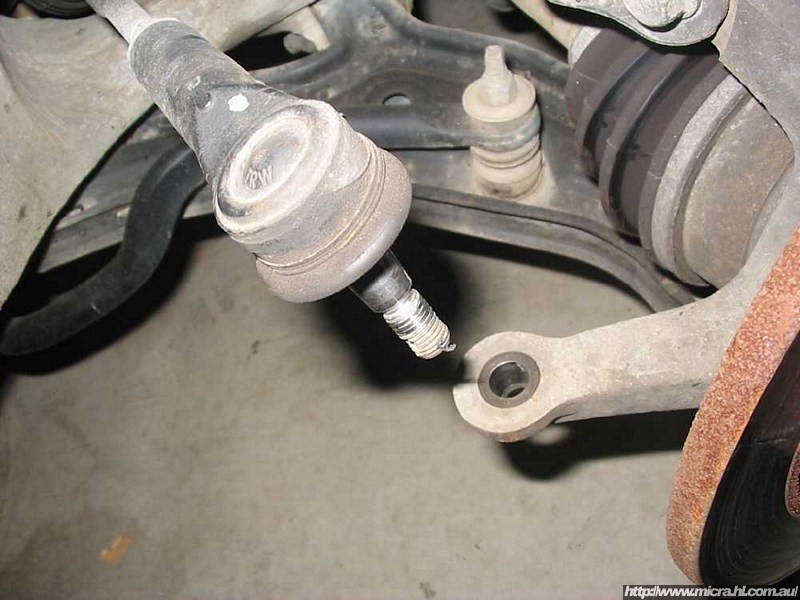
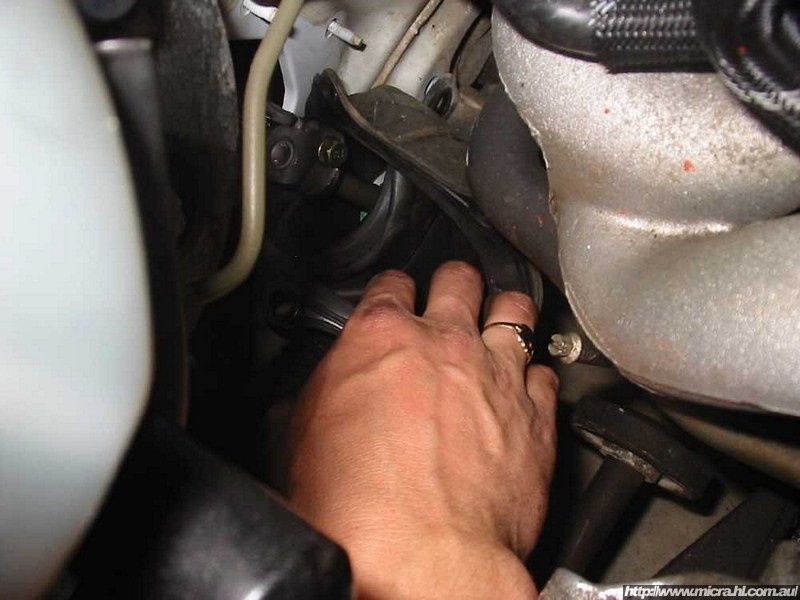
Now: If you go to Delux Auto Wreckers to source these parts, the guys there are extremely thorough. They made sure once, twice, and triple checked that I had all the parts before I left - the result? I was able to put it all together in a single weekend without going "ahh jesus, they forget to give me that little screw that I need for this bit"! Alternatively you could go to Nissan, get ripped off, and speak to parts salesmen who know less than you do about micras in particular. ProcedureOk firstly you need to unbolt the tie-rod ends from the steering arms coming from the hubs. You can do this by turning the steering wheel full lock to the left and doing the right wheel, then vice-versa. They are held on by little split-pins, so just bend them back and yank these split-pins out with a set of pliers. I bought a small packet of replacement split-pins from a hardware store for a couple of bucks - brand new straight ones go back in a lot easier when you're ready to put the car back together. Now when you turn the steering wheel it should be light and nothing should happen! Ok now put the car up on the ramps/jack stands and get underneath. NEVER get underneath a car when its only held up by one or more jacks - I have painful visions of what a skull would look like mushed between the concreate and your oil sump. Jack's can and do fall out from underneath cars. Your task now is to unbolt the stock steering rack. There is 4 large bolts mounting the rack to the base of the firewall/chassis you can't miss them. You may need to undo the two upper ones from above, coming down from the engine bay. That was easy wasn't it? Yep - but now you have to remove the rack. First, undo the uni-joint between the end of the steering column (poking through the firewall) and the rack. You will need to remove the rubber boot/cover thing to access it. Now, onto removing the rack itself. Hint : it doesn't pull through the holes in the chassis that allow the steering links to reach the steering arms near the wheels. You need to get it out through the hole that the drive shafts go through (well I did anyway, if you work something better out, tell me!). They're a bit wider and once you pull off the thin black plastic panel covering them, you are welcomed with oodles of room (well almost). Now, there's some technique involved. You will need another person to make this easier, get someone on either side of the car (best with the wheels off) and guide the rack right out towards the non-driver's side of the car as far as it will go. Once it can't go no further, the tie rod end on the driver's side, should be able to be pulled back through the chassis hole it came out of, and fed back out through the hole that the driveshafts use. With a bit of fiddling and swearing you should get it out pretty easily. Make sure you also remove the standard uni joint dangling from the steering column, because its hole is too small to grab onto the new power steering rack. Great now your car has no steering and is all ready for the new parts to go in. First, get under the car and remove the standard tensioner that bolts onto the side of the engine which tensions the skinny accessory belt. Once its undone, you'll also want to make room so that the new power steering belt can slip on once everything's in place. I loosened the alternator to do this, so back out from under the car again and back to the engine bay - get's a bit tiring doesn't it. Now fit the new tensioner in the place of the old one, but notice that the new one bolts on with 3 bolts instead of two. You should also now put in the steering pump, it kinda bolts off the tensioner aswell so make sure you have enough room for your hands to tighten them up once they're in place. That done, now's a good time to install the power-assisted rack. It has more stuff hanging off it than the standard rack, I found that I had to remove the two skinny metal pipes from the rack in order to fit it through the driveshaft hole and then bolt them back on and tighten them from under the car once the rack is through. The rack goes in the same side that you removed the other one from - the driver's side. It's a bit bigger, takes more fiddling, but it will go through eventually. Try rotating it around a bit to give a bit of room here and take a bit there while you're trying to avoid everything hitting and stuffing you up. Ok, from under the car, re-install those tiny metal pipes that you took off to get the rack in place. You might also want to roughly clamp the new rack in place, but don't tighen it up much, just loosely, chances are you may need to move it around for one reason or another before you're done. Now the fun part, get your hands in and clamp the new uni-joint in place. Make sure you do everything back up so that the steering wheel is in center when the rack is in center, otherwise you'll be taking off your steering wheel later to centre it all up (not a major drama). Its a bit of a bugger to get to, but it is do-able. I found my girlfriend's mini little hands were perfect for this - she did half of this part and yelled when it was too tight for her, and I squeezed in and hung off it for the last tight turns. Important Tip: It's crucial to how long you live that the uni-joint goes a decent amount over the spindles of from the column and the rack. There is a big recess in each spindle that shows you exactly where the tightening bolt has to lie. Make sure that you get it on far enough so that the bolt does infact end up lying in this spot, because it is possible to get the bolt on when it may not actually be in place, if it came loose it could easily slip off if its not in the recess. I had troubles with this initially, it almost seemed like that parts didn't fit, I was thinking that the uni-joint was too short, or that something was too short. Solution: You may need to get inside the car and access the steering column. Remove all the plastic cowling around the column so that you can easily access its mounts. Then slightly bend/manipulate the lower mounts so that the spindle on the end of the column can reach just that little bit further down towards the uni-joint. It makes all the difference between your car being safe and your car being deadly dangerous. It is possible that these column mounts were slightly bent during removing the standard parts and unbolting the standard uni-joint, so if they need bending down slightly, don't be concerned, its perfectly normal and the correct solution - you don't need to bend them far. You will also be able to better see how well the uni-joint bolts on looking from inside the car out through the firewall. Almost got power steering huh? Kinda, just a few more things to do. Now attack from the top of the car, loosely clamp in the resovoir and the big knuckle joint thing that has two pipes going to it. I found it pretty easy to work out where abouts they clamp on the car. The beauty is Nissan's is that they build their cars very smart - you will find a hole everywhere in the right spot just waiting to mount your power steering kit put there just incase this car ever ended up getting power steering fitted. Once that's done, poke all the piping down behind and next to the engine so that it is close to what its meant to plug into. It's pretty easy to work out, all the threads are different and the pipes sit in almost exactly the right spot if you've put everything in right as they are all bent exactly right from the factory to fit your little micra. Now you can basically fix the rack in place, tighen everything up, and now connect all of the hoses and pipes coming from the various components. One of the metal pipe that goes from the resovoir down to the (rack/pump - i forget) has a couple of screw mounts on it - you can't miss them. These are also very important and stop the pipe from dangling in amongst the belts and pulleys on the side of the engine. One of the holes is a bit tricky to get to, I found it easiest to access from under the car. It may seem that it is the wrong thread for the mounting screw, however as was the case with this hole on my car, it contained a bit of paint from the factory which was doing its best to stop the thread from starting. I persisted for 20 minutes in this tight little space and eventually banged it in there and tightened it up very hard (almost thought I was stripping it) until the paint was broken away and the thread went in beautifully. Now you can connect the tie-rod ends back up to the steering arms. Here's where you'll need to do a cheap home-job wheel alignment. I'm not an expert on this, but I know you are aiming for a small amount of toe-in on both wheels. That is, when you're steering wheel is straight, both wheels are minutely pointing inwards - I'm only talking a couple of mm (I think 4mm is the desirable measurement, but from the front to back of a wheel, that's bugger all, so its very subtle). Ok, so start by centering your steering. Then go to each side of the car and see how much each wheel is toeing in or out. Undo the locknuts on the steering links so that you can rotate them to make them shorter or longer. Have a play with it, and keep putting the wheels on loosely and repeating the process until they look pretty much parallel and straight. Tighten everything up and slip in your new split-pins and you should be on your way. Go right over the car and make sure that you haven't forget anything (or that I haven't forgotten anything in this article for that fact!). Did you leave a spanner sitting in the engine bay?! If you think you're right to go, then slowly fill up your resovoir with the DEXRON fluid until its full and gentlemen start your engines. Keep an eye on the fluid level while the engine is running as the pump and rack will soak up a bit of fluid once they turn over. You should use about a litre of fluid all up. Make sure to correctly adjust the belt tensioner too, too sloppy and you won't be driving the power steering pump, and too tight you could be placing extra load on the belt and the engine. This can easily be adjusted from underneath the car. Importantly: Your car is not yet considered safe to drive, if you are confident with your mechanical skills slowly drive the car just around the corner to the nearest workshop for a proper wheel alignment. One thing I found when I did my own home wheel alignment was that when standing 10 metres away in front of the car, it had a massive amount of camber and was very dangerous - the cause was that I had tightened the steering links up too much when doing the wheel alignment. I drove to a workshop very slowly at a quiet time and got the wheel alignment, and especially don't try any fast driving until the wheel alignment has been performed. All going well you should have a very nimble little micra with only 3.1 turns lock to lock instead of 3.9 that feels great to drive. If there's anything I've left out or haven't spent enough detail on, post a message in the forums and I'll see if I can help out. |